I love winter greens. I love how they’re heartier and tougher and denser than what grows in the summer and it just makes so much sense to me to eat them when it’s freezing outside. The more seasonally I eat, the more I really begin to understand the way that the plant world works, and the more it just feels internally crazy to try and eat tomatoes or strawberries when there’s snow on the ground. In the winter, only the strong survive!
While I love kale, I understand that a lot of people find it bitter or with too much bite. This is a great introductory kale dish, because the sauté really softens the leaves and, mashed in with the potatoes, the kale has this really delicious, slightly salty bite that balances and incorporates nicely with the starchiness of the potatoes.
sautéed kale with garlic and mashed potatoes
1 head kale, roughly chopped
1 clove garlic, crushed
olive oil for sautéing
1 ½ tbs soy sauce
1 – 2 lbs potatoes, peeled and chopped
1/8 – ¼ c soy milk
salt and pepper
Boil the potatoes until tender. While the potatoes are boiling, sauté the kale with the garlic in a fair amount of olive oil. Cook until it is well-wilted, stirring occasionally. Add the soy sauce, stir, and cook for a few minutes longer. Season with salt and pepper to taste. Drain the potatoes and mash them into the skillet with the kale, adding the soy milk to your desired consistency. Adjust the salt and pepper again, and serve immediately, alongside some fried tempeh or seitan.
I remember the first time that my mom bought me one of those warm, paper cones filled with spiced nuts and just how thoroughly they seduced my young taste buds. I learned much later that, typically, spiced and sugared use egg whites as their adhesive, which is what results in that thick, crispy shell encasing each almond, pecan, or walnut.
In my version, a reduced simple syrup works to the same effect, and it's super easy. If you haven't noticed, I have a pretty high spice tolerance, so feel free to adjust all of these measurements to your own tastes. The cumin is subtle, but does add a nice savory note underneath it all.
sweet & spicy roasted nuts
1 lb almonds and pecans, mixed
1 c sugar
1 c water
3 tbs cinnamon
2 tbs allspice
2 tbs sugar
2 tsp cayenne 1 tsp cumin dash of salt
Preheat the oven to 350. Spread the nuts in a single layer on a large baking sheet. Stir together all your spices and set aside. Mix together the sugar and water in a small saucepan and heat it, stirring constantly, over medium heat for 5 - 10 minutes. You want it to reduce enough so that it's syrupy and sticky. When it gets to that point, pour in the spices and stir well to incorporate. Pour the mixture over the nuts and stir with a rubber spatula until all the nuts are well-coated. Bake for 15 to 20 minutes, until the nuts begin to brown. Remove from the oven and cool on a wire rack. *This step is important, so that the nuts become crispy, and not soggy/mushy.
Despite the monstrous snow storm that roared through New York on Saturday, I actually managed to get out and to the market in order to pick up everything I needed for holiday gift-making/canning. Most importantly, six pounds of apples that were destined to be buttered.
I was really surprised because six pounds of apples (which really seems like a lot) cooked down to about 3.5 8-ounce jars... which means, a whole lot of work and very little to show for it. A word to the wise (from the wise?): this will take you all day. And halfway through, you'll probably wonder why you're going to so much effort. Well, friends, the answer is because 1) it's the holidays, and 2) because it's delicious and you'll feel so much better when you're eating it than if you'd just bought an $8 jar at the store.
A few notes: I don't have a slow-cooker, so this is a stove + food processor method. You can, alternatively, throw everything together in a slow-cooker and let it go for a good 8 to 10 hours, then strain it and process it. I also strain by hand, with a fine mesh strainer, but if you have a food mill, you should use that because it's way easier. All spice measurements are approximate. You should adjust them to your taste. Finally, please do not take my processing times as gospel. You can consult a canning guide, like the ones here and here. apple butter 6 lbs apples, cored and wedged (*do not peel) 3 c apple cider 3 tbs cinnamon 1 - 2 tbs allspice 1 - 2 tbs ground cloves 1 tsp star anise (optional) 1/2c to 3c sugar juice and zest of 1 lemon
Preheat the oven to 325 degrees.
Put all the apples and the cider in a very large pot and cook it over medium heat until the apples are tender and falling apart (about 15 - 20 minutes). Stir occasionally to prevent sticking. In batches, put the apple mixture in a food processor and blend until smooth.
Pour the blended apples into a large, oven-safe dish or pot. (I actually used my cast-iron skillet and it fit perfectly.) Add the cinnamon, allspice, cloves, and anise to the apples and adjust to taste. Stir well and add the lemon juice and zest. Put the pot in the oven and let it cook, uncovered for at least 45 minutes. As the apples cook down, they will become sweeter, so I recommend waiting at least this long before adding the sugar, which you should add to taste. I used about 3/4c total. Stir well, and return to the oven for 3 hours, checking and stirring occasionally. The butter is done when it is a spreadable consistency, and there are no pools of water on the top after it's stirred.
Once the butter has cooked down completely, remove it from the oven. Place a fine-mesh strainer over a large pot and, using the back of a spoon, press the butter through the strainer. You'll need to clean off the strainer every so often and, I found, that working in smaller batches was the easiest and most successful. Keep the leftovers (what wouldn't press through the strainer) in a bowl nearby. I recommend, if you have the time, straining the leftovers a second time. I got another 50% of butter the second time around.
If you aren't canning, either freeze the apple butter, or refrigerate it for up to a week.
If you're canning, heat the apple butter until boiling, fill 8-ounce jars and process each one for 10 minutes in a boiling water bath. If your jars don't seal, you can re-process them with new lids within 24 hours, or just refrigerate the jar and use it soon.
This is the season of my discovering love for formerly-eschewed vegetables, and following my successful reconciliation with beets, for the first time ever, I bought brussels sprouts. They were the first of the season, and I only picked up a few; I was skeptical, as the smell of the boiling brussels from my childhood is still etched in my olfactory memory. My dad was the lone brussels eater in my house, and you couldn't get me, or my sisters, far enough away from them. I honestly had no intention of ever cooking with these tiny cabbages... until a few weeks ago. I was having lunch with a co-worker who had brought in the ones she had made for dinner the night before. They were small and halved, browned at the edges and flecked with fennel and pepper. And they smelled incredible. Was it possible? I was persuaded.
The first night, I roasted my first brussels with olive oil, salt, pepper and shallots until they were tender and caramelized. They were so good. I haven't looked back since.
image via Country Living
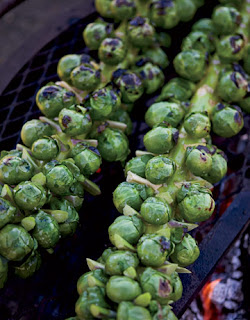
This week, I bought them on the stalk. Did you know that this is how they grow? I had no idea!
To roast them, preheat to 350 degrees. Toss your brussels with olive oil, salt and pepper and cook until browned. I like them with shallots, but you could toss in garlic, fennel, or any type of onion. If you're able, try them on the grill! Finish with a little lemon juice, and serve alongside any main course.
Have a more creative preparation? Submit it to Food52. Their weekly recipe competition features brussels sprouts this week, and, if you win, you'll be included (and given full credit for your delicious idea) in their forthcoming cookbook.
It is cold in New York City. Yesterday, we could see snow from our 10th floor office. Even if it melted before it hit the ground, yesterday it was cold enough to snow! With temperatures in the low 40s for days, I've been drinking lots of hot cider, pulling flannel blankets onto the bed, and putting the oven to good use. This time of year, when the sky is grey and the sweaters come out, one of my favorite things to cook and eat are roasted vegetables. The way that squashes and brussels and romanesco and onions caramelize in the oven is, to me, quintessentially autumn.
Last night, I chose butternut squash. I wanted something with a kick to balance out the sweetness, so I whisked up a glaze of chili pepper and lime. The spice is present, but subtle, not overpowering the traditional honeyed notes of the squash, and the sweet browned edges of each bite round out the mild acidity of the lime.
A note on preparation: there is probably an easier way to cut apart the squash than the way I went about it last night. Wanting to roast in cubes, I sawed the whole thing into slices, then cut off the skin, then chopped it into bite-sized chunks. It was tough, even with sharp knives. It would have been simpler had I roasted the squash briefly before cutting it apart, but I was impatient. Proceed however you see fit.
roasted butternut squash with chili lime glaze 1 medium butternut squash, cubed 1/4 c olive oil juice of 1 lime 1/4 tsp cayenne 1 dried chili, minced very small pinch of hot curry powder s/p
Preheat oven to 400 degrees. Whisk together olive oil, lime juice and chili. Toss, with squash, in a baking dish until well-coated. Sprinkle with cayenne and curry and toss again. Top with salt and pepper. Roast for 30 minutes, or until tender. Adjust seasonings, and finish with a small drizzle of maple syrup. Serve with wild rice, toasted quinoa, or any protein.
Yesterday, we welcomed an exciting (and much-anticipated) addition to our little kitchen: an island! We'd ordered a kitchen table and island about six weeks ago, and by now, had given up any hope that they would actually arrive. These pieces (which are completely gorgeous) have more than quadrupled the cooking/prep space. I am more giddy than you can imagine.
I am embarrassed to admit that I did not christen them properly with an elegant and elaborate meal.
Ogunquit, Maine
G. and I had been out of town for the holiday weekend and there the fridge and pantry were practically empty upon our return. I found three small beets, three carrots, a cippollini, and a few pounds of new and fingerling potatoes. This turned out to be a very fall-feeling dinner (complete with a carved pumpkin centerpiece!) and came together quite well despite scant ingredients. (I feel obligated to note that I am a recent beet-convert. I remember a few months ago when the Times was raving about beets... beet soup! roasted beets! beet salad! pickled beets! beets beets beets! It took me until this past summer to finally give up the ghost of beets-in-a-can and see what these roots were really all about. Turns out, they're all about being delicious. If you, like me, have been scared off because of early pickled beet experiences, it's time to move on. It's worth it!)
roasted beets and carrots 3 small - medium beets, peeled and quartered* 3+ medium carrots, peeled, cut into large chunks 1 tsp fresh rosemary, diced s/p olive oil
Preheat oven to 450 degrees. Toss beets and carrots with olive oil in a small baking dish. Sprinkle with sea salt, pepper and rosemary. Roast for 30 minutes, or until tender, stirring occasionally to prevent sticking. Adjust salt and pepper when you serve, to taste, and finish with a squeeze of lemon if you like.
smashed potatoes about 15 small, new/fingerling potatoes, scrubbed well 2 bay leaf 1 small cippollini (or shallot), sliced into half-moons 1/4 c (or less) soy milk olive oil s/p
Boil potatoes with the bay leaves for 30 minutes, or until tender. Reserve about 1/4 c of the water, remove bay leaves, drain the potatoes, and set aside. In a medium saucepan, saute the onion until golden and crispy. Add potatoes and smash with a few tablespoons of olive oil. Add soy milk and the reserved water gradually until you reach your desired consistency. Season with salt and pepper to taste, top with paprika and serve.
*If you wash your hands immediately, or even peel the beets under cold running water, you'll have less trouble with stains on your skin and nails. Still be very careful to avoid contact with fabrics, though.
This past weekend celebrated two of my favorite things in New York City, in festival form: chile peppers and pickles.
On Saturday, rainy and dreary as it was, the Brooklyn Botanical Gardens hosted their annual Chile Pepper Fiesta. We spent most of our time in the chile + chocolate tents, tasting from artisanal chocolatiers like Taza (incredible, authentically stone-ground chocolates) and Fine & Raw (raw, unprocessed, totally vegan, totally delicious). There were many other craft chocolatiers, but these were really the stand-outs in my mind. We left with the two-piece bon bons from Fine & Raw, a pint of horseradish pickles from Horman's Best Pickles and a bag of yellow split pea fritters, kind of like Indian-spiced hush puppies. I cannot, for the life of me, remember the name of the vendor!
chili/chocolate bon-bons from Fine & Raw
Sunday brought the International Pickle Festival to a Lower East Side parking lot. The rain had the benefit of scaring off a lot of visitors from the Botanical Gardens. Sunday was beautiful. And completely packed. People were waiting in lines twenty deep for samples. My patience was tested, and ultimately, we didn't last long. I did manage to get my hands on some of Rick's Picks Smokra. SO GOOD. I also managed a peanut butter + pickle sandwich (better than expected) and some really amazing, barely pickled beets. Unfortunately, the afternoon was such a blur, I haven't retained any of the names of the different picklers. Such is life.
These festivals were sandwiched in between openings and performances, Free Fridays at MoMA, and a trip to the farmer's market; come Sunday night, I felt so literally dizzy and reasonably exhausted, that I just wanted to curl up on the couch with a cup of something warm and cozy. So I started a batch of chili.
Every time I make this, it's a little different, but the core ingredients are the same. Feel free to add any other vegetables and bean varieties. Black and kidney beans are traditional, but you could use any type you like. This also freezes really well, and tastes great the next day.
Two Bean Chili with Corn 1 clove garlic 1 medium onion, diced 3 medium carrots, diced 3-4 stalks celery, diced 4 - 10 chile peppers, diced (I always use a variety, whatever I've happened to pick up. Choose what you like and adjust for your heat tolerance accordingly.) 1 green bell pepper, diced kernels from 3 ears corn 1 16 oz can crushed tomatoes 1 16 oz can kidney beans 1 8 oz can black beans 1 can/bottle beer (preferably lager) 3 tbs chili powder 1 - 2 tsp cayenne 1 tbs cumin 1 tbs black pepper 1 tsp hungarian paprika (sweet or smoked) salt to taste scallions to garnish
Saute onion, carrot, celery and garlic in olive oil in the bottom of a very large pot. Cook until onions are translucent and fragrant. Add chile and green peppers, saute for another few minutes. Add the can of crushed tomatoes and stir well. Bring to a boil. Stir in both beans and the corn. Bring to a boil again. Add the chili powder, cayenne, cumin, pepper, and paprika and stir well. Reduce to simmer and cook, uncovered, for 15 minutes. Stir again, and add the beer.* Allow the whole thing to cook for at least a half hour, preferably an hour. The longer the chili cooks, the more the flavors will develop and the heat of the chilies will change. Adjust the seasonings as needed. Salt to taste. Top with chopped scallions and serve in a large mug.
*I've never used beer in chili prior to this week. I'd seen it used in a number of recipes, and had some in the fridge so figured I'd give it a shot. This batch of chili was really, really good, but I can't say for sure what role the beer played. That in mind, feel free to leave it out, and add water to reach your desired consistency.
This past weekend, my sister came to visit from Vermont, and brought with her possibly the most perfect housewarming gift: a copy of Judith Jones' My Life in Food and a Lodge cast iron skillet. I started the book on Sunday, and, if it weren't for a day job, I wouldn't put it down. Jones recounts her time spent in Paris in the late 40s, her first encounters with true French food and how this entire experience shaped her life and her ideas about cooking. I picked up My Life in Food shortly after re-reading "Goodbye to All That" --- Joan Didion's essay on coming to, and ultimately leaving, New York. Both of these women write about a sense of abandon, a surrender to what it is to be in your twenties, just getting by. A graceful carelessness. Either this attitude is lost on my generation, or writing about one's early twenties in a new city is inherently romantic and nostalgic. Probably a little bit of both.
In my early twenties, I find myself writing at work (with no sense of any possible consequences) and spending my eight-hour days dreaming up dinners and sauces and sides. Last week was spent planning the menu for a Saturday evening housewarming party (white bean spread on crostini, rosemary crackers, toasted pepitas), and yesterday, I brainstormed how to use up the oyster mushrooms that had been in my fridge for a few days too long. Most likely inspired by Jones' stories of rich, French food, I thought that they would be best served with shallots and potatoes in a red wine sauce. Unfortunately, I got home to find cipollinis where my shallots usually are, and an open bottle of white wine in the fridge. Not wanting to crack open the nice bottle of shiraz we'd received as a housewarming gift, I decided, like most other days, that I'd have to be adaptable. I'd make it work.
What I wound up with, while not what I necessarily had in mind, was delicious in its own right. The white wine reduction, poured over browned potatoes and onions flecked with mushrooms, pushed the dish into this rich, buttery field that I didn't even know was possible with olive oil. While a red wine sauce would have resulted in a deeper flavor, the white wine's complexity was on the surface, and it was fantastic.
Potatoes, Onions and Mushrooms in White Wine Reduction 10-15 any small, fingerling potatoes, cut into large chunks* 2 medium cipollini onions, large chunks 2 - 4 large oyster mushrooms, roughly chopped 1/4 tsp rosemary, finely diced 1/4 tsp, or less, salt pepper to taste 1/2 cup+ white wine (I used a pretty cheap Chardonnay) chopped fresh flat-leaf parsley to garnish
Over medium-high heat, saute the potatoes, onion and mushrooms in a good amount of olive oil. Stir frequently to prevent sticking and cook until potatoes and onions begin to brown (5-7 minutes). Once browned, add a 1/4 c water to the pan and cover, reducing to simmer. Cook until potatoes are tender, stirring occasionally and adding more water if necessary (about 15 minutes). When potatoes are tender, and water has cooked off, transfer potatoes/onions/mushrooms to a plate or platter and set aside. Turn heat to high and deglaze pan with wine, scraping up all the browned bits on the bottom and sides of your skillet. Allow to reduce briefly (no more than 5 minutes). Pour sauce over potatoes, top with chopped parsley and serve.
*A note on potatoes: G. and I frequently buy a wide variety of heirloom potatoes mostly because it's fun to use different shapes, sizes and colors. Beyond noticing that a particular variety of fingerling was waxier, and retained a better shape, the taste differences between them are negligible. BUT! If you ever, ever see Adirondack Blues... get them. These were, hands down, the most buttery, melt-in-your-mouth potatoes I have ever tasted. Believe me. I didn't know that a potato could taste like butter. It can. It really, really can.
I have an over-zealous love for potatoes. Baked, fried, roasted, boiled, mashed, or any combination within... I could eat them every day. There's a stand at the market that specializes in root vegetables. They have the best beets, onions, carrots, and potatoes, in every color of the rainbow, in the entire city. Every week, I fill up a bag with handfuls from each bin: La Ratte, Adirondack Blues, Austrian Crescent, Belle de Fonteney, and on Sunday morning, they become one of my most favorite and simple dishes: breakfast potatoes.
The guts of this recipe are simple: potatoes, onion, chilies, rosemary, salt, pepper and a few other spices. It holds up remarkably well to whatever you have in your spice rack or lurking in your vegetable drawer. I've thrown in kale, tomatoes, curry powder, mustard seed. Adapt away.
Sunday Brunch Potatoes 10 smaller, mixed heirloom potatoes, chopped bite-size 1 shallot (or other small onion), chopped 1 small, hot chili, finely diced 1/4 tsp (few shakes) each of chili powder, cayenne pepper, sweet hungarian paprika sprig fresh rosemary (or dried, crushed between your fingers), diced s/p to taste
Pour a generous amount of good olive oil in a large skillet. Add shallot, saute briefly. Add potatoes and stir until all are well covered with oil. Add chili. Stir and cook for five minutes. Add spices and rosemary, stir, and cook for another fifteen minutes. Season with s/p to taste. Cover and cook until all potatoes are tender, stirring occasionally to prevent sticking.
Yesterday was spent helping a good friend chop, saute and simmer all afternoon in preparation of a dinner party. We talked about how, at least for us, cooking with a friend would either make or break the relationship, depending on each person's distinct kitchen personality and adaptability, and how recently, we've noticed a trend among our friends and other people our age to rediscover the fun of making things ourselves rather than buying them at the supermarket. Not just dinners and cereals, but pantry basics like tomato paste, cheeses, enchilada, barbeque and hot sauces. There is this rejection of outsourced processing that we've grown up with, which is exciting; this all feels like fresh and new territory, when, in reality, people were making these things in their kitchens for a hundred years before the factories took over. We are beginning to appreciate our food by hand-crafting the contents of our cupboards. This conversation was inspired by Justine's recent purchase of a tortilla press. We were, each for the first time, going to make tortillas from scratch.
Justine had purchased masa, and the instructions were simple: mix masa with water until a firm dough forms. Form small dough balls, place between two sheets of wax paper, and press. Easy enough. Long story short, twenty tortillas later, we'd figured it out. Justine formed balls and pressed (between plastic wrap, not wax paper), and I cooked them in a hot skillet for about thirty seconds on each side. The trick, I learned, was to lay the tortilla in the skillet for about two seconds on each side, then thirty seconds on each side. I still don't know why, but the quick flip kept one side from cracking. Whatever works.
To stuff the tortillas, we made roasted potatoes with fennel and poblano peppers, grilled green beans, and fried tempeh. On the side, we had fried green tomatoes and African Tomato Peanut soup. It sounds like a lot of flavors, and it was, but they were all rooted in seasonality; this was late summer's windfall.
This soup is incredibly easy and so delicious. I was shocked that so few ingredients could work together and create a really complex flavor.
African Tomato Peanut Soup 1 small onion, diced 3 cloves garlic, minced 2 lbs roma tomatoes, skins removed 2 tbs natural peanut butter 2 tsp turmeric 1 tsp minced, dried chilies s/p to taste 1.5 c cooked basmati rice
Saute the onion and garlic over medium heat until translucent and fragrant. Puree the tomatoes in a food processor and add to the onion and garlic. Bring to a boil. Add the peanut butter, turmeric and chilies and stir well to combine. Simmer for 30 minutes, stirring occasionally. Add salt and pepper to taste. Add water if soup has become to thick, and stir in the rice. Simmer for another 5 minutes and serve.
Until recently, I’d never canned. Too frightened by botulism-ridden horror stories, I left the endeavor safely in the hands of those more daring than I. When a friend asked me if I’d like to learn a few weeks ago, I hesitated, expressed my fear (to which she responded, you’ll know if your food is bad), got over it and dove in. Lindsey had been canning for a few years, never lost a jar, and with her confident guidance, I felt prepared to give it a shot.
We were making tomato sauce, her own recipe, out of the pounds and pounds of tomatoes she’d harvested from her garden that day.
*Note: many canning recipes I’ve read stick to very strict measurements and pH balances, to ensure the safety of the food you’re preserving. This is much more heirloom-style canning, with techniques passed down through word-of-mouth, and shared between close friends. That in mind, though my sauce was successful and L. has never lost a jar, I cannot vouch for the safety or longevity of this method. Generally, you should not keep home-canned food for longer than a year. This time next year, tomatoes will be in season again, anyway.
What you’ll need:
*This recipe yields 2 quarts of sauce. Increase as needed.
1 very large soup pot
2 quart-sized glass jars with 2 new, clean lids and tightly fitted rings
20 (approx) tomatoes (we used romas)
3+ cloves garlic
1 white onion
1 red bell pepper
1-3 hot chili peppers
1.5 c fresh basil, tightly packed
olive oil
balsamic vinegar
s/p
Chop all tomatoes into small chunks, with skins and seeds. Set aside. Dice onion, garlic and basil very fine. (Seriously, as tiny as you can get it.) Dice the peppers, and set aside.
Saute onion, garlic and basil in your pot with about a tablespoon of oil. You don’t want to fry the onions, but you do want them to become translucent. Stir frequently to prevent sticking/burning. Allow to cook for at least five minutes, until onions and garlic are fully cooked and fragrant. Add tomatoes and stir. Allow sauce to simmer for 15-20 minutes, stirring occasionally. Add peppers, salt and pepper. Stir, and allow to simmer for another 20 minutes. Add a few rounds of balsamic and stir. Allow to cook down for about an hour, stirring occasionally.
Wash and dry two quart jars very well, and line them up next to your pot. Bring the sauce to a roaring boil. (This is important!) Hold the jar with an oven mitt or towel; it will get hot. As quickly as possible, spoon the sauce into the jar, using a funnel if you have one. You should leave approximately half an inch of room. Wipe the rim clean and screw the top on tightly. Repeat with the second jar. In about two minutes, you should hear a distinctive ping when the jar seals. In ten minutes, once the jar has cooled a little, press your fingers on the top. It should not give under pressure. (If the top still clicks, your cap hasn’t sealed and you’ll have to refrigerate it, and use the sauce within a few days, or freeze it for as long as you like.) If your lid is firm, your jar has sealed and will keep on the shelf for up to one year.
Having signed our lease at the end of August, we are still in the process of unpacking and procuring furniture. While the kitchen island is en-route from Boston, I've become very accustomed to preparing every meal with about 15 square inches of counter space. Particularly challenging? Last night's tomatillo salsa.
Tomatillo salsa is traditionally blended, whether it's roasted or raw. Our currently ill-equipped kitchen doesn't allow room for a food processor, but luckily, G. is a whisking/vegetable mashing extraordinaire. Black bean burgers, mashed potatoes, red velvet cupcake batter bowls all get handed off to her. She pulverized our tomatillos in about three minutes flat.
A note about tomatillos, if you've never used them before... (which I hadn't until last week). When choosing them, you're looking for a slightly sour/tangy smell and a distinct firmness. If they're soft, they've gone bad. When you get them home, peel the husks and scrub away the sticky film.
If, like me, you are without a blender or food processor, dice your tomatillos as small as possible. Then, pile them together and rock your knife back and forth over and over and over until the juices begin to release and the seeds are dislodged from the flesh. At this point, transport the tomatillos to a medium-sized mixing bowl, squeeze in the juice of half a lime, and take to the whole thing with a potato masher or the back of a wooden spoon. Work the tomatillos until they are soupy and no chunks remain. Then, proceed with the salsa!
Tomatillo Salsa (Raw Salsa Verde)
5 - 6 tomatillos, diced then pulverized (or, if you're luckier than me, processed in a blender) juice of 1 lime 3 medium, firm roma tomatoes (or other smaller variety), diced 1 small red onion, fine dice 1 dried red chili, diced very fine 1 medium-sized, medium-heat chili, diced (with or without seeds, your call) full handful cilantro, chopped well s/p to taste
Combine all ingredients and mix well. (If you prefer a more traditional salsa verde texture, throw everything in a food processor and pulse until you reach your desired consistency.) The flavors will meld and develop the longer this is allowed to sit, and it tastes amazing the next day.
This past winter, G. and I spent two months in Los Angeles. While we’ve since readjusted to the climate and sensibilities of our home coast, there is one thing we long for on a near-daily basis: tacos. The place we stayed in for those few weeks was within walking distance of an incredible taco stand called Machos Tacos. The above plate cost about $4.00.
Mexican food on the East coast is more complicated, somehow unbalanced and consequently less satisfying. What I appreciated most about West coast food was its straightforwardness. A taco: two tortillas, rice, refried beans, pico, lettuce and guacamole. (Even more straightforward was Best Fish Taco in Ensenada: two fried shrimp folded in a single tortilla, wrapped in foil.) I, however, am unable to exercise such restraint. What follows is one of many attempts to recapture the flavors we were introduced to in January. I added a number of vegetables because summer has ended and we’re facing the prospect of a long winter with no greens.
Zucchini, Mushroom and Potato Tacos
1 can black beans
2 bay leaves
1 tsp cumin
2 tsp chili powder
1 tsp sweet/smoked hungarian paprika
few solid shakes of black pepper
1 medium zucchini, cubed
8 - 10 mushrooms, roughly chopped (I used cremini from the market, but substitute as you like)
5 - 10 small, heirloom potatoes such as fingerlings, cubed
1/2 c broccoli florets (optional)
1 medium chili pepper, like Anaheim, diced
1 dried hot chili, like serrano, diced as small as you can get it (or sub red pepper flakes)
Juice of one lime, freshly squeezed
corn tortillas
Place black beans and bay leaves in a sauce pan over medium heat with a little water. Add cumin, chili powder, paprika and pepper. Sprinkle some cayenne if you like. Stir occasionally. (Watch to make sure they don’t stick, and add water as needed or they’ll wind up almost refried.) Cook for about 10 - 15 minutes, then turn off heat and allow the beans to sit and develop their flavor.
Dice and boil potatoes in a medium pot until tender.
Pour a fair amount of oil in a large skillet. Saute mushrooms and broccoli, if using, for about two minutes. Add zucchini and chopped chili and stir. Saute for another few minutes until zucchini begins to become tender and everything is fragrant. Drain and add potatoes. Squeeze in the juice of the lime and stir. Add the dried chili, or chili flakes. Using a wooden spoon or spatula, mash about half to three-quarters of the potatoes in the pan. Stir everything really well and allow to cook together for about ten minutes.
Heat tortillas in a medium-sized skillet, flipping twice, until flexible. Fill with beans and vegetable filling. Top with chopped cucumbers, avocado and/or tomatillo salsa (recipe to come), and serve.